Showing posts with label DIY. Show all posts

Monday, February 22, 2016

DIY - Plastic-free Waterproof Shower Curtain


One of the largest plastics in your home is the shower curtain and liner. These PVC vinyl products release toxic chemicals like phthalates when heated by a hot shower or bath. Opening them for the first time can be overwhelming because if the smell they release - inducing headaches and respiratory issues.

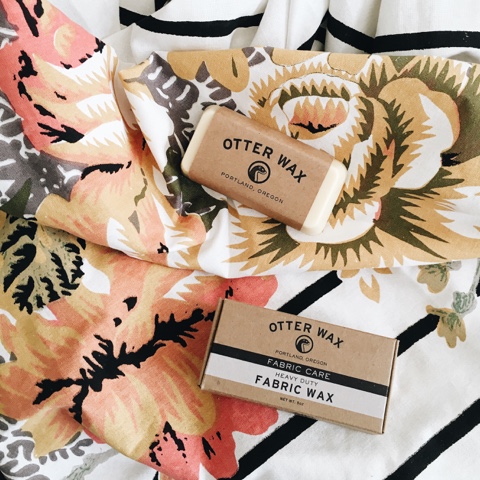
While retailers have started making PVC-free alternatives, I wanted to find a plastic-free method for our home and family. I recently discovered a company from Portland called Otterwax that makes  natural products to care for leather and fabrics that endure the elements.

One of their products is the fabric bar, which contains no petroleum or silicone. I decided to try the bar on the inside of our cotton shower curtain to prevent the absorption of water. Here is a step-by-step to trying this method at home:

• wash and dry curtain
• rub fabric bar in a back-and-forth motion to create friction
• allow to cure before using

I love the smell of the wax and not having to use a shower liner in the future. For more information on Otterwax products, you can visit their website at: www.otterwax.com

Sunday, August 16, 2015

Attic Renovation: 5 Years in the Making


We've spent the last 5 years transforming the attic of our almost 100 year old bungalow home into a master bedroom. It's been a long process but we couldn't be happier with the results.

It was really important to us that our upstairs matched the style of our 1920s home. Everything from trim pieces to the color of the hardwood floors matches the downstairs design that is the original part of our home.

Utilizing space was also important so we incorporated lots of shelves. Our his and hers closets have sliding doors and drawers on each side that also act as bookshelves.

The most expensive part of the project were the wood ceiling boards and floors. We had the option of cutting corners by using faux wood or beadboard but instead opted for the real thing and now our house smells amazing because of it.

"We shape our dwellings, and afterwards, our dwellings shape us." - Winston Churchill

What I love most about our master bedroom is that we had a hand in the creation of it. With the help of my in laws, we were able to complete our project without the help of a contractor. Everything from the bookcase for a bannister to the installation of the 3 sided gas fireplace purchased for $50 from Habitat Humanity Restore is our work.

Because we created this space as a family, we can now look at any corner of the room and tell you the story behind it. As with any project, there were times we had to rework ideas or redo things because they didn't work out. Now that we see the end result we are happy for those minor edits and wouldn't change a thing.


Tuesday, June 30, 2015

Essential Oils: 5 Rollerball Recipes for Travel


Since making the switch to essential oils six months ago, we have started learning how to blend oils in rollerball bottles that we can keep on hand to get through the day. Not only do essential oils never expire but they also smell amazing. I have even had people ask me what scent I'm wearing when out in public!

Rollerballs are a good idea for stretching your oils farther with a carrier oil. They can be applied along the spine, wrists, bottoms of feet, back of the neck or temples. When purchasing your rollerballs, be sure to buy glass bottles since essential oils can eat through plastic. You also have the option of clear or dark amber bottles. If you decide to purchase clear bottles, be sure to keep them in a dark place as to not expose them to light which could damage the quality of your oil. Both clear and amber 10ml bottles can be found on online. Here are the ones I am using.

The below recipes are some of my favorites. After adding the oils to your bottle, just top it off with whichever carrier oil you choose. You have several options for a carrier oil including almond oil, jojoba oil, sunflower oil and fractionated coconut oil. I used jojoba oil in some of my bottles and fractioned coconut oil in others. Shake bottle to mix oils before use.

Stress away
10 drops valor
10 drops stress away
5 drops lavender
5 drops grapefruit

Sleep
15 drops cedarwood
15 drops lavender

Awake
8 dropspeppermint
8 drops lemon
4 drops frankincense

Sinus/Headache
16 drops eucalyptus
8 drops peppermint

Focus
12 drops rosemary
8 drops lemon
4 drops peppermint

Interested in essential oils?

Click here to get started!

Happy oiling!

Sunday, March 8, 2015

DIY All Natural Cleaning with Essential Oils


Not only is making your own household cleaners cheaper than buying store bought ones but it's a healthier way of living. We share our home with our cats and dogs and knowing those paws come into direct contact with the cleaners we use on floors and countertops makes it important that those cleaners are as safe and as chemical free as possible.

Homemade cleaners are also more beautiful to look at in their dark amber glass bottles. So instead of utilizing the under the sink cabinets to store them, I display them on open shelves. The dark amber glass bottles are important as they keep the oils from being exposed to light and from interacting with the chemicals in plastics.

Thieves All Purpose Spray

Ingredients:
1/8 tsp salt
5 drops Thieves essential oil
1/4 cup vinegar
1/4 cup water

Instructions:
Fill a 2oz dark amber glass spray bottle with ingredients in the order listed. Shake to combine and before each use.

Lavender Linen Spray:

Ingredients:
1 tbsp witch hazel
Water
20 drops lavender essential oil

Instructions:
Fill a 2oz dark amber glass spray bottle with water until 3/4 full. Add witch hazel and lavender essential oil. Shake to combine and before each use.

Lemon Wood Dusting Spray

Ingredients:
2 tsp liquid castille soap
20 drops lemon essential oil
Water

Instructions:
Fill a 2oz dark amber glass spray bottle with soap and lemon oil and fill with water. Shake to combine and before each use. To use, spray on wood surfaces and wipe with a dust cloth.

All of the essential oils listed are included in the Young Living premium starter kit. If you are interested in signing up as a Young Living distributor to get your premium starter kit, click here!

*If you want the most bang for your buck, sign up to be a wholesale member and get the premium starter kit! Even if you don't plan on selling, you still get 24% off with no obligations. The starter kit alone includes 11 oils and comes with a diffuser! Happy oiling!

Sunday, November 30, 2014

DIY: Fresh Pine Tree Garland


Christmas decorating doesn't have to cost money or time. I whipped this garland up in about 20 minutes and it's not Christnas without the smell of pine!

Supplies:

- Several trim pieces from any type of pine tree.
- Scissors
- Twine
- Nails or tacks

Instructions:

1. Soak trim pieces in water so they stay fresh longer. The more time they soak the longer they will last.
2. Arrange trim pieces so they face the same direction and overlap slightly.
3. Cut 3 inch pieces of twine and tie trim pieces together.
4. Use small nails or tacks to hang garland by the twine pieces.

Make sure you do not hang your garland near a heater vent and never use your fireplace with garland hanging over it. The closer your garland is to a heat source, the quicker it will dry outBe sure to spritz water on your garland occasionally to keep it fresh.

Sunday, November 9, 2014

DIY Natural Cat Repellent Spray for Plants


Anyone that owns a cat has learned the hard way that cats and plants cannot coexist in the same habitat. But if you love plants as much as I do, there is an all-natural way to keep your cats away from house plants. And it smells great, too!

  • What you need:

  • 2 oz. spray bottle
  • 6 drops citrus essential oil (lime, lemon, lemongrass or orange)
  • Enough water to top off spray bottle

  • Instructions:

    • Shake bottle well.
    • Spray plant soil (avoid leaves) and outside of plant pot.

If citrus is not your favorite scent, other essential oils that work are lavendar, peppermint and eucalyptus. You can also mix scents to your liking.

Saturday, November 1, 2014

The Great Whiteout


When we purchased our 1920s bungalow home six years ago, we loved everything about it. There was so much character and so little that needed updating (other than some beige carpet removal). We loved the idea that we didn't need to paint as the neutral colored walls were already to our liking.

But over the summer, I noticed that every pin I was pinning on Pinterest was of rooms with white walls. As a teacher with the summer off and time on her hands, I decided to test the waters and paint our downstairs bathroom. Not only was I nervous that white walls would be too modern, but I also worried what my husband would think. It was a success. The white color made the bathroom appear larger AND it matched the white tiles. The next thing I knew, I was buying more paint and more rooms were being transformed. We already had white trim and white ceilings so the white inevitably made each room lead into the next room so there was no where for your eye to stop. Everything came together and with every room now painted white our home became more cohesive. We also made the decision to remove the blinds from our original 1920s pressed glass windows in the living room so we could enjoy them instead of covering them up. That decision not only helped open up the room and let more natural light in, but it cuts back on all the dusting that comes with having blinds.


How to make the transition

Before:
After:

There are hundreds and hundreds of options when choosing a white paint. Needless to say, it can be overwhelming. We chose BEHR Premium Plus Ultra interior eggshell enamel in the color "White".


  • It's better to go with a warm white instead of a cool bright white
  • You will want an eggshell finish. Eggshell is a great finish for any room (including the kitchen) because it has just enough gloss for easy cleaning but not enough to make your walls look constantly wet.
  • 2 coats for coverage and 3 coats when painting over darker paint colors.


We are so happy with our transformed home and it goes so well with our recent decision to simplify our lives. More on that in a future blog.

Sunday, October 26, 2014

DIY Scented Wood Car Air Freshener


I have yet to find a car air freshener that is both attractive and natural smelling. Luckily, there are ways to scent your car to mask any pet or fast food smells. 

  • What you need:

  • An old fashioned clothing line pin
  • Container with lid (Mason jar)
  • Your favorite scented oil

  • Instructions:

    • Place clothes pin inside glass jar with several drops of scented oil.
    • Close lid and let sit overnight to let the natural wood absorb the oil
    • Remove clothes pin and insert into car vent

As you drive, the air from the vent will blow the scent throughout the car.